Tutorial: AWS Federation
A Defakto-issued JSON Web Token-SPIFFE Verifiable Identity Document (JWT-SVID) can be used to authenticate to Amazon Web Services (AWS) APIs and assume an AWS IAM role. This is done by setting up an AWS Identity Provider that supports OpenID Connect (OIDC). Defakto makes this process easier by automatically providing an OIDC Discovery document endpoint for your trust domain(s).
Preconditions:
- Active SPIFFE trust domain (e.g. "example.com")
- Existing Kubernetes cluster
- AWS account with permissions to create an IAM Identity Provider, IAM Policy, IAM Role, and an S3 bucket for testing.
This tutorial will demonstrate using a combination of the AWS console and the command-line, but deploying the necessary infrastructure can also be performed with tools like Terraform, CloudFormation, or Amazon's CDK.
1. Create an S3 bucket and upload test file
- Create a text file on your local computer named
test.txtcontaining the following:Defakto-to-AWS authentication succeeded! - Navigate to the Amazon S3 page in the region of your choice.
- Click Create bucket.
- For Bucket type choose "General purpose."
- Under Bucket name type the name for the S3 bucket that you’ll use for
testing. The bucket name must be unique across all Amazon S3 bucket names.
Save this name in a file named
test-bucket; you'll need it later. - Keep the defaults for all other settings.
- Click Create bucket.
- Click the name of the test bucket to open the bucket.
- Click Upload.
- Add the
test.txtfile to the upload area using Add Files or by dragging and dropping. - Click Upload.
2. Determine the OIDC Discovery Endpoint
Defakto automatically publishes an OIDC Discovery document for all trust domains.
- Ensure that
spirlctlis installed., and usespirlctl loginto log in via SSO. - Run
spirlctl trust-domain info <TRUST_DOMAIN>to find the right URI for your trust domain. For example, here is the output for a demonstration trust domain:$ spirlctl trust-domain info defakto-demos.example.comGetting Trust Domain Info⠼ID td-wyw33falztName: defakto-demos.example.comStatus: availableSelf-Managed: falseSPIRL Agent Endpoint: td-wyw33falzt.agent.spirl.com:443SPIFFE Bundle Endpoint: https://fed.spirl.org/t-o9cpowm5yo/td-wyw33falzt/bundleJWT Issuer: https://fed.spirl.org/t-o9cpowm5yo/td-wyw33falztJWKS Endpoint: https://fed.spirl.org/t-o9cpowm5yo/td-wyw33falzt/jwksOIDC Discovery Endpoint: https://fed.spirl.org/t-o9cpowm5yo/td-wyw33falzt/.well-known/openid-configurationCreated At: 2024-09-05 00:41:36.716 +0000 UTCLast Updated At: 2025-07-07 15:15:14.718 +0000 UTC - Copy the URI for JWT Issuer and save in a file named
jwt-issuer.txt. Make sure it does not end with/.well-known/openid-configuration.
By convention, /.well-known/openid-configuration is appended to the OIDC
discovery endpoint to retrieve JWT issuer metadata. Here's an example of what that
document looks like:
$ curl -s https://fed.spirl.org/t-o9cpowm5yo/td-wyw33falzt/.well-known/openid-configuration |jq
{
  "issuer": "https://fed.spirl.org/t-o9cpowm5yo/td-wyw33falzt",
  "jwks_uri": "https://fed.spirl.org/t-o9cpowm5yo/td-wyw33falzt/jwks",
  "authorization_endpoint": "",
  "response_types_supported": [
    "id_token"
  ],
  "subject_types_supported": [],
  "id_token_signing_alg_values_supported": [
    "RS256",
    "ES256"
  ]
}
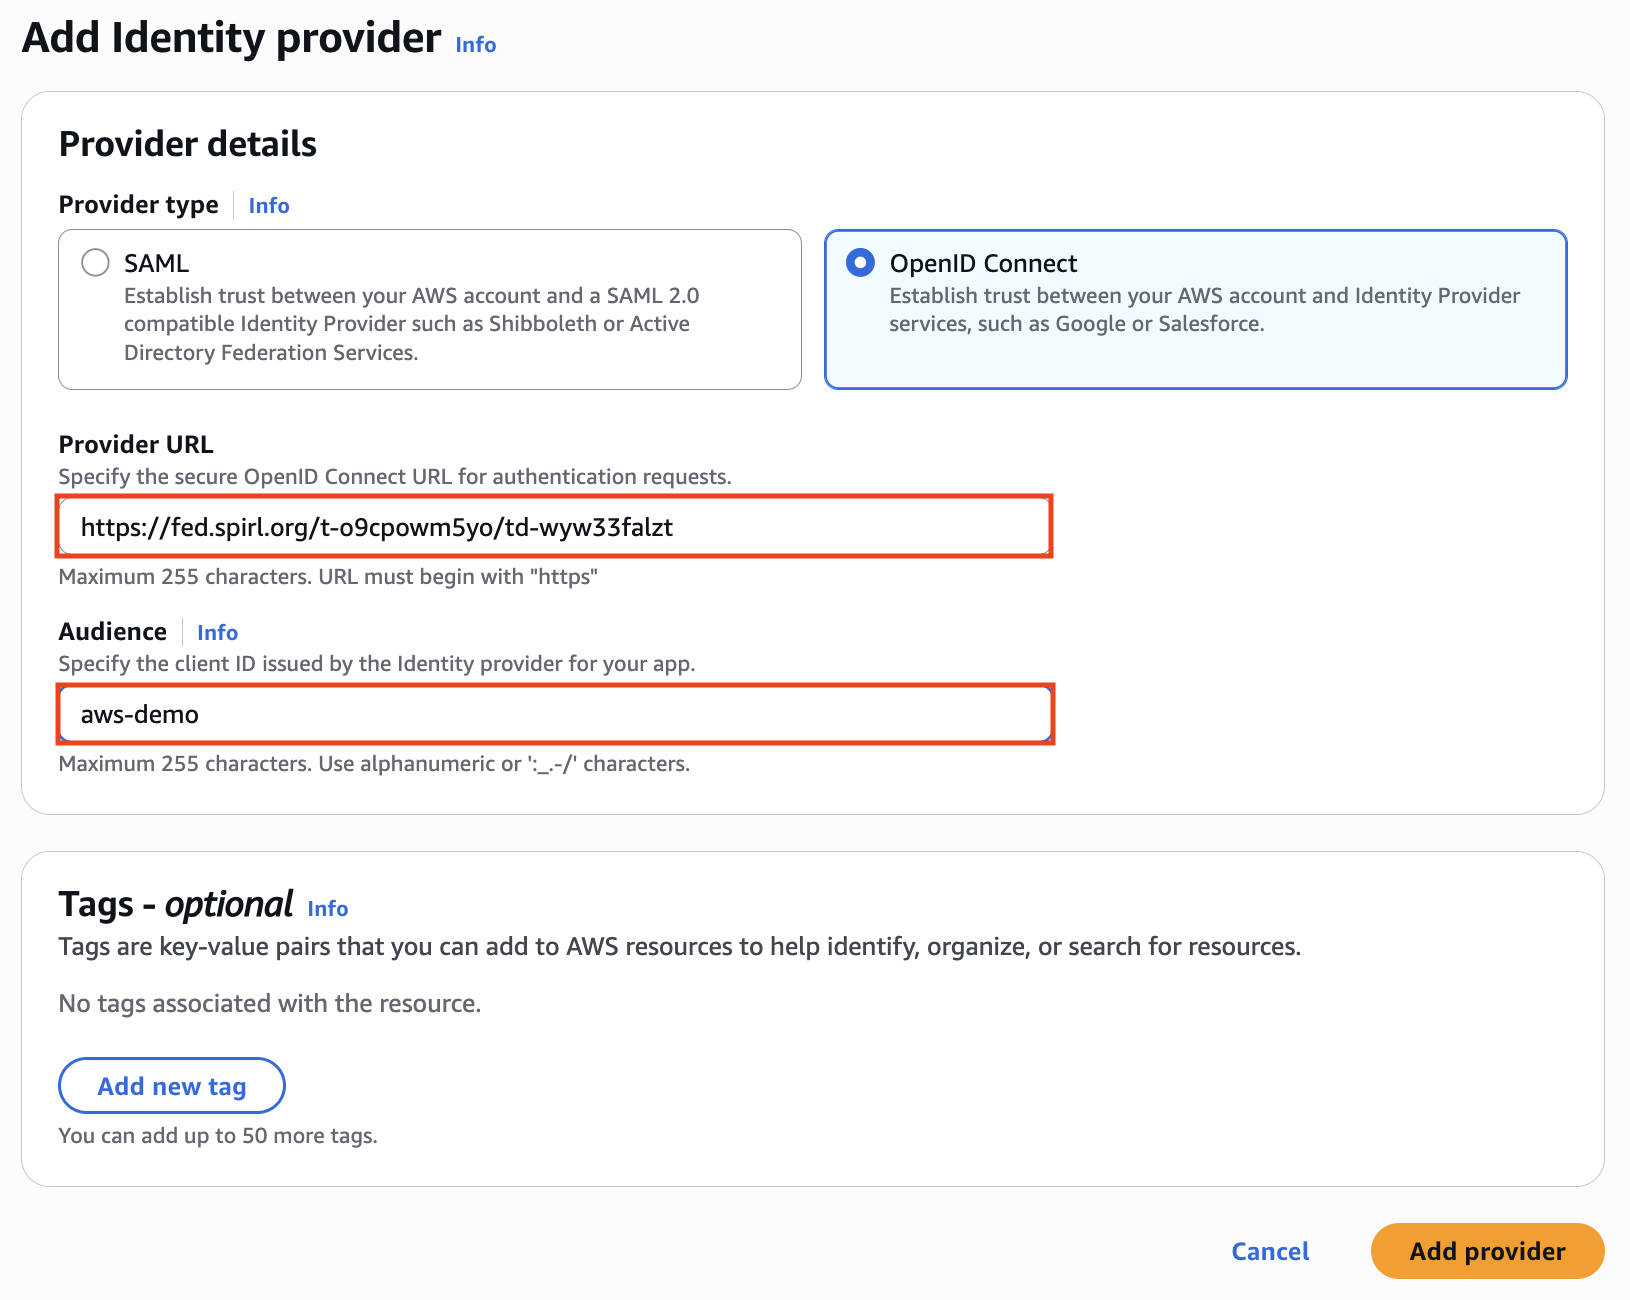
2. Create an AWS Identity Provider
- In the AWS Console, navigate to the Identity and Access Management page.
- Click Identity providers on the left menu and then click Add Provider at the top of the next page.
- For Provider type, choose "OpenID Connect."
- For Provider URL, enter the "JWT Issuer" value saved in
jwt-issuer.txt - For Audience, enter "aws-demo".
Here's an example of what the form would look like:info
In production, the actual value depends on the application or workload configuration. The application either passes in a value when calling the Workload API, or Defakto can be used to configure custom JWT claims for a given cluster.
- When ready, click Add Provider.
OIDC Identity Provider URLs must be unique across all regions in a given AWS partition.
3. Provide access to test bucket
The following AWS IAM policy governs access to the test S3 bucket used in this example.
- Navigate to the Identity and Access Management page.
- Click Policies on the left and then click Create Policy in the top middle of the page.
- Click the JSON tab.
- Replace the existing skeleton JSON with the following JSON policy definition
and replace
<NAME OF TEST BUCKET>with the name of the S3 test bucket created in "Create an S3 bucket and upload test file."
{
    "Version": "2012-10-17",
    "Statement": [
        {
            "Sid": "OverallApiAccess",
            "Effect": "Allow",
            "Action": [
                "s3:PutAccountPublicAccessBlock",
                "s3:GetAccountPublicAccessBlock",
                "s3:ListAllMyBuckets",
                "s3:ListJobs",
                "s3:CreateJob"
            ],
            "Resource": "*"
        },
        {
            "Sid": "TestBucketAccess",
            "Effect": "Allow",
            "Action": "s3:*",
            "Resource": [
                "arn:aws:s3:::<NAME OF TEST BUCKET>",
                "arn:aws:s3:::<NAME OF TEST BUCKET>/*",
                "arn:aws:s3:*:*:job/*"
            ]
        }
    ]
}
4. Create an IAM Role for the Identity Provider
The IAM role contains the connection parameters for the OIDC federation to AWS such as the OIDC identity provider, IAM policy, and SPIFFE ID of the connecting workloads.
- Navigate to the Identity and Access Management page.
- Click Roles on the left and then click the Create role button.
- Select Web identity as the "Trusted entity type."
- In the Web identity panel, select the identity provider that you created in step 2.
- For Audience, select "aws-demo"
- Click Next.
- Search for the policy created in step 3. (Hint: Filter by type "Customer managed" to limit results)
- Click the check box next to that policy and then click Next.
- Give the role a meaningful name (e.g. defakto-federation-example)
- Click Create role.
- Use the search field to find the IAM role you just created, and click the role.
- At the top of the Summary page, underneath ARN, copy the role ARN
into the clipboard by clicking the small icon next to it. Save the ARN in a
local file named
role-arnfor use in the testing section.
5. Deploy the spiffe-demo app in debug mode on the test cluster
We'll modify the spiffe-demo deployment from the "Quick Start"
instructions. by adding a debugging container.
This will provide us with a terminal environment containing
spirldbg, a command-line
utility that will allow us to easily retrieve a JWT with the "aws-demo" aud value.
- Ensure that
spirlctlis installed.. - Bootstrap an existing Kubernetes cluster (e.g. "demo-cluster") with Defakto:
spirlctl cluster add "demo-cluster" --trust-domain "example.com" --platform k8s
- Install the
spiffe-demoapp and enablespirldbg:helm repo add spiffe-demo https://spirl.github.io/spiffe-demo-apphelm -n spiffe-demo install spiffe-demo spiffe-demo/spiffe-demo-app --set app.enableDebug=true --create-namespacetipIf you have installed the
spiffe-demoapp before August 2025, you may need to runhelm repo updatefirst to get the latest version of the chart. - If this is successful, the following command will show a running pod with two containers:
kubectl get pods -n spiffe-demo
- Connect to the
spirldbgcontainer via the terminal:kubectl exec -it <POD_NAME> -n spiffe-demo -c spirldbg -- sh - Retrieve a JWT with the
aws-demoaudience and copy the base64-encoded token on the line after "Token:"# spirldbg svid-jwt --audience aws-demoSuccessfully received JWT SVIDSPIFFE ID: spiffe://defakto-demos.example.com/kind-aws-demo/ns/spiffe-demo/sa/spiffe-demo-appExpiry: 2025-08-26T23:59:56ZToken:eyJhbGciOiJSUzI1NiIsImtpZCI6ImtzXzJ6VG5VV1RKd0YxWXBGUnVxd09EWXRZUUxadiIsInR5cCI6IkpXVCJ9.eyJhdWQiOiJhd3MtZGVtbyIsImV4cCI6MTc1NjI1Mjc5NiwiaWF0IjoxNzU2MTY2Mzk2LCJpc3MiOiJodHRwczovL2ZlZC5zcGlybC5vcmcvdC1vOWNwb3dtNXlvL3RkLXd5dzMzZmFsenQiLCJqdGkiOiJhYWVmM2MzOWYxMDdhZTRlYjdkYmJjYzRkZDY4NzlhNCIsInN1YiI6InNwaWZmZTovL3NwaXJsLWRlbW9zLmV4YW1wbGUuY29tL2tpbmQtYXdzLWRlbW8vbnMvc3BpZmZlLWRlbW8vc2Evc3BpZmZlLWRlbW8tYXBwIn0.apEKOR2mnq8Qw-GSnQe00fSu4TjvvjPEJbiph1UW1DPstrlAUQalh-N2TPqHsl348wVyA1LyL9Tg5C9xuVXoc9zrY6QS77YfzGnU5muThRpLe7SFGaZH42DLjUh_BClnwNJLKWqTO9Uohsfd-yfXNCjs8X9E01pJHLM_St2qkHAofioGcM1bAbmlGdXfIKeBXBf-gFKWzrztsTWZZt9WYhOUiBIXUNr8IC4Kf_fZRsVxk5Z47uoBr2vKWpdz2QhlOWZUF8k7KQlR6FD23g3BqVWK_7xKUDVfacaxJI3IhnR92hopxNMkofBpmCFfBvDMLb-6WZvNCNPKcq2Tz6yRVA - Paste this token into a local file named
svid.jwt. - Also copy the SPIFFE ID from the
spirldbgoutput and paste this into a local file namedspiffe-id.txt.
6. Test Access to AWS S3
Now we’re ready to test AWS federation with a Defakto-issued JWT-SVID.
- The ARN of the role you created earlier should have been saved in
role-arn. If not, return to the AWS console, find the ARN of the IAM role there, and paste it into the file. - Run the following commands:
If successful, this will output the following and theexport AWS_ROLE_ARN=$(cat role-arn) && \AWS_WEB_IDENTITY_TOKEN_FILE=svid.jwt aws s3 \cp s3://$(cat test-bucket)/test.txt local-test.txt
local-test.txtfile should be copied to the current directory.See the "Troubleshooting" section if you encounter any errors.download: s3://<NAME OF YOUR TEST BUCKET>/test.txt to ./local-test.txt - Verify that the test.txt file exists and contains the correct text:
$ cat test.txtDefakto-to-AWS authentication succeeded!
7. (Optional) Use a SPIFFE ID to further lock down the role
The role we created allows access to JWTs signed by a single Trust Domain Server, with
a specific audience (aud) value. This is defined by the role's trust
relationships. Here's an example of what that might look like:
{
    "Version": "2012-10-17",
    "Statement": [
        {
            "Effect": "Allow",
            "Principal": {
                "Federated": "arn:aws:iam::438253597286:oidc-provider/fed.spirl.org/t-o9cpowm5yo/td-wyw33falzt"
            },
            "Action": "sts:AssumeRoleWithWebIdentity",
            "Condition": {
                "StringEquals": {
                    "fed.spirl.org/t-o9cpowm5yo/td-wyw33falzt:aud": "aws-demo"
                }
            }
        }
    ]
In this example, note the string fed.spirl.org/t-o9cpowm5yo/td-wyw33falzt.
This is the "discovery domain". We'll need it later.
Let's limit access to a particular SPIFFE ID as well. We'll do that by adding another line in the "Condition" section.
- Navigate to the Identity and Access Management page.
- Click Roles on the left, and use the search field to find the IAM role created in step 4, and click the role.
- Click the Trust relationships tab near the middle of the page and then click Edit trust policy.
- In the JSON access control policy, add a condition line at the end of the
StringEqualsattribute to restrict access to workloads matching the workload SPIFFE ID. This is installation dependent, and in our example looks like this:spiffe://spirl-demos.example.com/oidc-demo/ns/spiffe-demo/sa/spiffe-demo-app. So in our example, we're going to add the following line:Assuming you created the"fed.spirl.org/t-o9cpowm5yo/td-wyw33falzt:sub":"spiffe://defakto-demos.example.com/oidc-demo/ns/spiffe-demo/sa/spiffe-demo-app"jwt-issuer.txtandspiffe-id.txtfiles, this command will produce the correct line for you:Here's an example of the updated trust policy (note the new comma after theprintf '"%s:sub": "%s"\n' "$(sed 's|https://||' jwt-issuer.txt | tr -d '\n')" "$(tr -d '\n' < spiffe-id.txt)"audline):{"Version": "2012-10-17","Statement": [{"Effect": "Allow","Principal": {"Federated": "arn:aws:iam::438253597286:oidc-provider/fed.spirl.org/t-o9cpowm5yo/td-wyw33falzt"},"Action": "sts:AssumeRoleWithWebIdentity","Condition": {"StringEquals": {"fed.spirl.org/t-o9cpowm5yo/td-wyw33falzt:aud": "aws-demo","fed.spirl.org/t-o9cpowm5yo/td-wyw33falzt:sub": "spiffe://defakto-demos.example.com/oidc-demo/ns/spiffe-demo/sa/spiffe-demo-app"}}}] - Click Update policy. The change will take a few minutes to propagate.
Now the Identity Provider will not only verify the issuer and audience, but require a specific SPIFFE ID as well. The IAM "Condition" block allows for more complex logic. Consult the AWS documentation for more information.
Troubleshooting
An error occurred (403) Error
If in step 2 of testing you get an error message that includes An error occurred (403), the S3 bucket name in the AWS policy may not match the S3 bucket you specified on the command line.
(ExpiredTokenException) Error
If in Step 2 of testing you encounter an error message that includes
ExpiredTokenException, the JWT token has expired. Retrieve a new token using
spirldbg.
These JWT tokens have an expiration time of XX minutes, so you must complete the
test within that time.
You can decode the token by pasting it in the tool at https://jwt.io . There you
can check the token expiration time by hovering your mouse pointer over the exp
field.
In a production environment, you will need a way to automatically refresh the JWT tokens for access to AWS. SPIFFE libraries are available for a number of popular languages.
Token audience contains more than one audience
When multiple aud values are present in the JWT, the AWS IdP requires the use
of an azp
claim. The
simplest solution is to limit the JWT-SVID to a single audience.
The full error looks like this:
fatal error: An error occurred (InvalidIdentityToken) when calling the
AssumeRoleWithWebIdentity operation: Token audience contains more than one
audience while authorized party is not present